


31 The Precision Test Environment (PTE)
The PTE (Precision Test Environment) is a boot environment you can use to administer a T.O.V.A. test outside of the inconsistent timing of modern operating systems like Windows and Mac OS.
Note: Most new Windows 8 and 10 systems CANNOT boot the current PTE. For more information, please see section 36.1.
Administering a PTE session requires rebooting your computer to our PTE operating system. This can be a complex, technical operation behind-the-scenes (see section 31.4), but we’ve made it simple for you.
Note: For systems with an external monitor and speakers (usually desktop systems), the T.O.V.A. can administer tests without rebooting. See section 32 for details.
31.1 Testing the Precision Test Environment
To see how the PTE works or test any problems you could encounter without launching a new session, you should test the PTE. This is available at the end of the Hardware Setup wizard (section 14) or by choosing the ‘Help’ button on the main window. When you choose ‘Test PTE’, you will be presented with a window of options.
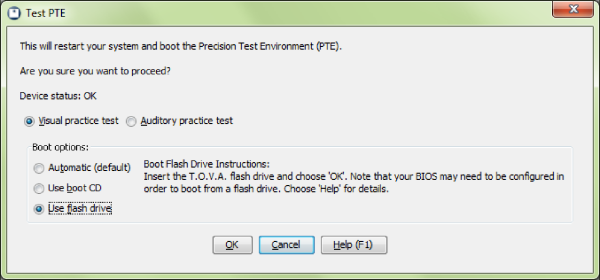
Test PTE options (PC)
When you choose ‘OK’ your system will reboot to the PTE.
Note: Macs and some Windows systems may require using a boot CD or USB flash drive to launch the PTE. Follow the instructions given for your system or see section 31.5 for more assistance.
When testing the PTE, you should verify the following:
-
Your display has been calibrated correctly (Visual-only) (section 29.4)
- You can hear the instructions clearly, but they are not too loud
- That you can complete the Practice test successfully
- That you can hear the Practice test (Auditory-only)
If Test PTE works successfully, you should be ready for PTE testing.
31.2 The PTE interface
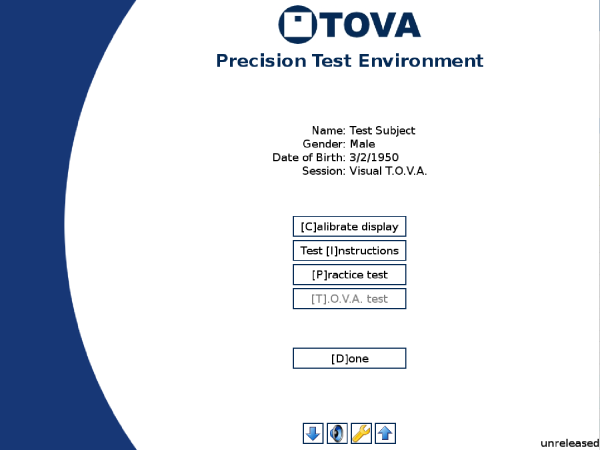
The Precision Test Environment
The PTE interface mimics the External A/V session interface.
At the top you will see the main subject/session information. You should be sure that this is correct, or you may be administering the wrong test!
Below that information is a column of five buttons, one for each of the five steps of administering a T.O.V.A. test. As you complete each step successfully, a green check will appear beside the button. If instead a yellow warning sign appears, that step did not finish successfully, and you may want to repeat it.
-
Calibrate Display
- - (Visual testing only) - Your first step in the PTE is to calibrate your display. You only have to calibrate one time and the data will be stored for future tests, so you can skip this step in the future, but you must calibrate before you can administer a PTE test! Thereafter, the T.O.V.A. will remember your PTE Calibration information, so the next time you test you won’t have to re-calibrate. Note: If you install a new monitor or video card, however, it’s important that you recalibrate the T.O.V.A. to that new hardware.
Note: This button only appears for visual testing. The auditory test does not require calibration.
Once calibration has completed successfully, a green check will appear next to the button. This indicates that the PTE has valid calibration data, and it should also appear automatically the next time you launch a PTE Visual Test session. If your monitor fails calibration, see section 29.4.
- Test Instructions
- - This will play the test instructions for your subject. See section 33 for more information.
- Practice Test
- - Presents the practice test for the subject. When the subject finishes the practice test, the results of the test will be displayed. If they look unusual, you may want to go back and review the Test Instructions again, to make sure they understood them. You can re-display these results by clicking the small button next to the ‘Practice Test’ button.
- T.O.V.A. Test
- - Administers the T.O.V.A. test to the subject. When the subject finishes the test, a summary of the results will be displayed; this is a good time to be sure that all the stimuli were administered, and there were an appropriate number of button presses. You can re-display this summary by clicking the small button next to the ‘T.O.V.A. Test’ button.
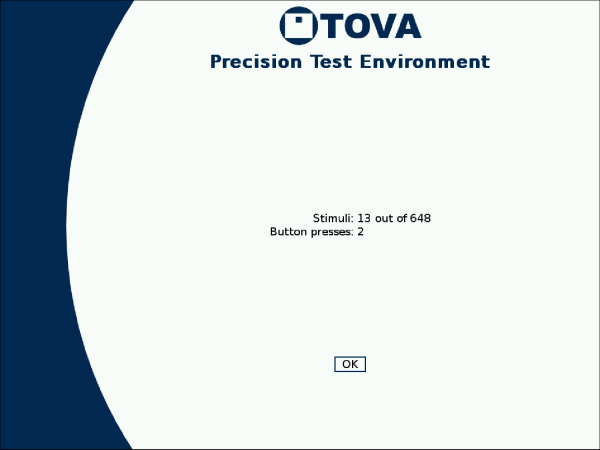
Results of an aborted PTE test
- Done
- - Once you have successfully administered the T.O.V.A. test, you should see four green checks (or three for an Auditory test). Clicking ‘Done’ will return you to your OS, where you can save the test results to the database.
- Volume controls
- - At the bottom of the PTE menu are the volume controls. The up arrow (↑) raises the volume one step and the down arrow (↓) lowers it. Each time a brief audio clip will be played, and a number will be displayed. The middle button turns on or off the test instruction audio. Note: If you turn off the test instruction audio, you will have to manually step through the instructions using the right arrow key (→) on your keyboard.
- Advanced
- - If you have problems with the T.O.V.A. PTE, T.O.V.A. tech support may ask you to access the new Advanced PTE menu. Click the wrench button at the bottom of the main PTE menu (or press ‘A’) to bring up the Advanced PTE menu.
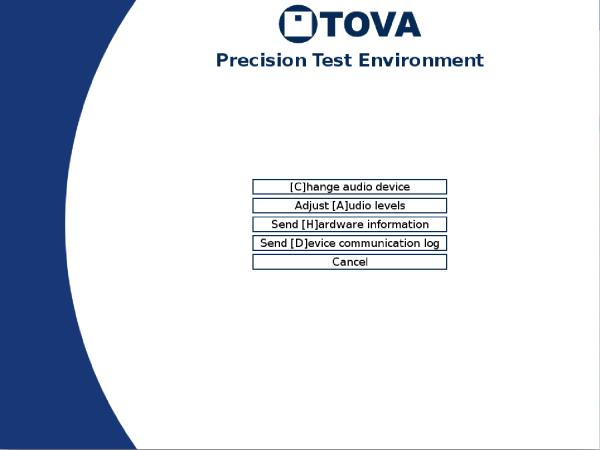
The Advanced PTE menu
-
[C]hange audio device
- - On some systems, the PTE may find more than one audio device available, even if you have no special devices plugged in. Click the right one, or try them all. Hit the ‘1’ key for the first device, ‘2’ for the second, etc. See section 29.6.1 for more information.
- [A]djust audio levels
- - The main PTE menu lets you adjust the volume up or down. If the volume is still wrong or the sound is distorted, you may need to make special adjustments here. See section 29.6.2 for more information.
- Send [H]ardware information
- - If you encounter problems, this will tell us all about how the PTE sees your system’s hardware. See section 34.1 for more information.
- Send [D]evice communication log
- - This log can give us information about PTE problems that Hardware Information does not. See section 34.2 for more information.
31.3 Special Keys
Note: Unless otherwise noted, special keys function only in the main PTE menu.
-
Button Keys
- - You can click on buttons to perform most functions, but you can also use your keyboard. Most buttons have a letter in brackets, such as [P] to start the practice test. Press that key to activate that button or hold the ‘Ctrl’ key to activate the results button next to it (e.g., Ctrl-‘P’ to see the practice test results). You should also press ‘Enter’ for the ‘OK’ button and ‘Esc’ for ‘Cancel’.
- Volume Control
- - Press ↑ or ↓ to raise or lower the volume. Press the ‘S’ key to disable/enable the test instruction audio (even while the instructions are playing).
- Esc
- - The ‘Esc’ key will interrupt just about anything that’s happening. You can press ‘Esc’ during the pre-test instructions, for instance, to skip the instructions and go straight to the test.
31.4 What is the PTE?
Note: This is a rather technical explanation, only for the geeky and curious.
The T.O.V.A. Precision Test Environment (PTE) is a minimal Linux 3.0 system tuned for real-time response. It uses SDL, ALSA, the Speex audio codec, and other standard tools and libraries to present the T.O.V.A. test instructions and stimuli with guaranteed timing accuracy and precision, within a simplified interface.
Entering the PTE requires rebooting out of your normal operating system. If you’re using the Microsoft Windows operating system, then each time you launch a PTE test session we use Grub4DOS (a universal boot loader that’s a modified version of GNU GRUB) to boot the PTE and then ensure that Windows starts again on your next boot. On Windows, we add the PTE boot image as a boot option; when you reboot to the PTE we send a /bootsequence command to the Boot Configuration Data store, which temporarily changes your system’s boot display order, causing it to boot the PTE by default.
For our MacOS X customers, and for Windows customers who can’t boot the PTE automatically, we provide a bootable flash drive as an alternative. For more information about using the T.O.V.A. flash drive, section 31.5.5.