


34 How-To
This reference section gives simple instructions on technical procedures.
34.1 Collecting hardware information from the PTE
If you encounter problems using the T.O.V.A. PTE, we may ask you to send us a Hardware Information log from the PTE. This will send us information about how the PTE sees your system hardware and may enable us to improve the next version of the PTE.
Note: Generating a PTE log will overwrite any test data on the T.O.V.A. USB device .
34.1.1 ...Starting from your OS
If you’re not in the PTE at the moment (i.e., you’re in Windows or MacOS, and you can run other applications, browse the web, etc.), sending us hardware information is easy!
-
Quit all of your open applications, saving your work as necessary.
- Attach your T.O.V.A. USB device and run the T.O.V.A. . If prompted, make sure to save any session data still on the T.O.V.A. USB device .
- Choose ‘Help’ and then ‘Collect hardware information from PTE’.
- Here you have to answer a question: Are you able to boot to the PTE menu?
If you are, just boot to the PTE as usual. Choose ‘OK’, and your computer will begin restarting. It will collect the information and return to your OS.
If you are not able to boot the PTE, use the T.O.V.A. flash drive to send us a log:
-
If ‘Use flash drive’ is not already checked, please check it.
- Insert the T.O.V.A. flash drive that came with your T.O.V.A. kit.
- Choose ‘OK’, and your computer will begin restarting.
- (Mac-only:) After the power light goes out, press and hold the ‘C’ key until the CD begins to boot.
- Your computer should restart from the flash drive, and you should see a blue menu that says ‘T.O.V.A. Boot Media’.
Note: If your computer does not boot from the flash drive, then you may need to reconfigure your computer; see section 31.5.3 for more information.
- At the blue screen, you have three seconds to use your up and down arrow keys to select the ‘Log debugging information to the T.O.V.A. Device’ menu item. If you don’t get to it in three seconds, you can reboot your computer to try again.
- Hit ‘Enter’, and the PTE will log your computer’s hardware information to the T.O.V.A. USB device . When it’s done, your computer will restart.
- Eject the CD after your computer restarts. If you get back to the blue menu, then choose ’Return to your operating system’.
- Your computer will start back up and, once you’re logged in, automatically run the T.O.V.A. . Note that it may take a few minutes to start up, depending on your computer.
- Once the T.O.V.A. has started up, a dialog will appear saying, “There is important technical information from the PTE...". Choose ‘Yes’.
- Enter any necessary information into the technical support request window and choose ‘Send’.
The information you send may help us resolve the issue for you and likely others as well. Thank you for helping us improve the T.O.V.A. !
34.1.2 ...Starting from the PTE
If you’re already in the PTE and encountering problems, sending us hardware information is still pretty easy:
Note: Generating a PTE log will overwrite any preference changes and test data on the T.O.V.A. USB device .
-
Click the wrench button at the bottom of the main PTE menu (or press ‘A’). This will bring up the advanced PTE menu (Figure 112).
- From the menu, choose ‘Send [H]ardware information’. The screen will change to a black screen with lots of white techno-babble. When it’s done, your computer will restart.
- If you are using the T.O.V.A. boot CD, eject it now.
- Your computer will start back up and, once you’re logged in, automatically run the T.O.V.A. . Note that it may take a few minutes to start up, depending on your computer.
- Once the T.O.V.A. has started up, a dialog will appear saying, “There is important technical information from the PTE...". Choose ‘Yes’.
- Enter any necessary information into the technical support request window and choose ‘Send’.
34.2 Sending a device communication log
If we believe there is a specific problem involving communication with the T.O.V.A. USB device , we may direct you to send us a Device communication log. The purpose of this log is to record the nitty-gritty details of interactions between the T.O.V.A. USB device and the PTE.
Note: Generating a PTE log will overwrite any preference changes and test data on the T.O.V.A. USB device .
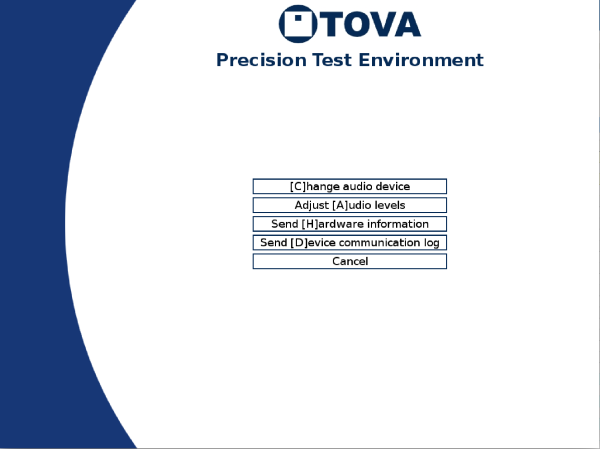
The advanced PTE menu
-
Launch a PTE session as you normally would (this will not cost you a test credit). After your system finishes rebooting, the PTE menu should appear.
- Since we need a log of interactions during specific tasks, you should perform those tasks now. For instance, if this is a problem with calibration, do a calibration; if it happens during a practice test, run a practice test; etc. When you have finished the task, press ‘Esc’ to return to the PTE menu.
- Click the wrench button at the bottom of the main PTE menu (or press ‘A’) and then choose ‘Send [D]evice communication log’. The screen will change to a black screen with lots of white techno-babble. When it’s done, your computer will restart.
- If you are using the boot CD, eject it now.
- Your computer will start back up and, once you’re logged in, automatically run the T.O.V.A. . Note that it may take a few minutes to start up, depending on your computer.
- Once the T.O.V.A. has started up, a dialog will appear saying, “There is important technical information from the PTE...". Choose ‘Yes’.
- Enter any necessary information into the technical support request window and choose ‘Send’.
The information you send may help us resolve the issue for you and likely others as well. Thank you for helping us improve the T.O.V.A. !
34.3 Manually updating the T.O.V.A.
With the T.O.V.A. 9’s Automatic Update, we’ve tried to make keeping your T.O.V.A. up-to-date with the latest features and fixes easier than ever. However, sometimes automatic update will fail (Did you really close all your programs before updating?), and in this case you may want to update your T.O.V.A. manually.
A manual update works just as well as the automatic one, with one caveat: You must have access to Administrator permissions. Here’s how you do it:
-
Find the latest update. Go to http://files.tovacompany.com/installers/release/current.cgi.
This will give you the installer (a ‘.pkg’ or ‘.exe’ file), and you should download it to somewhere you can find it.
Note: The installer is large (about 125 MB at the moment). If you have problems downloading it, you might need to find a system with a better internet connection. We’ve seen problems with some Wi-Fi connections, though most work fine. You can always download the installer from a more reliable connection to a USB flash drive and take it to the other machine. If you do not have a flash drive available for this purpose, you can request one from The TOVA Company.
- Exit the T.O.V.A. and any other applications that are running (You should do this before installing any application, really).
- Run the installer. Just like the first time you installed the T.O.V.A. , it may confirm/request Admin permissions, ask you to accept the license, etc.
- Once finished, you may run the T.O.V.A. .
That’s it! The good thing about a manual update is that it may make apparent what error was causing the update to fail before, and perhaps even let you correct it.
34.4 Moving a T.O.V.A. database
Note: We recommend ALWAYS backing up your T.O.V.A. database (section 21) before attempting any procedure such as this.
Moving your database is pretty easy in the T.O.V.A. . First, make sure you’ve backed up your T.O.V.A. database (section 21). Then simply change your database path, and the T.O.V.A. will offer to move the database for you. Here’s how it works:
-
If you browse to select a database path,
\data
will be added at the end. That folder (and the files and folders inside it) is your database. If you type your path into the ‘Path’ field, the folder is not added; your database path will be as you typed it.
- When you choose a new database path and then click ‘Save’, the T.O.V.A. will check if there is a database there already. If there is, it will connect to the new database and shut down the old one.
- If there is no database at the new path you’ve chosen, when you click ‘Save’ you’ll be given the option to move the previous selected database to the new location. Make sure that the old path and the new path are correct, so that the correct database is moved to the correct location. The database will be copied to the new location and the database at the old location will be deleted. Therefore, this should NOT be used as any kind of backup technique.
- If there is no database at the new path, and you choose not to move the database, a new database will be created at the new location, containing one example subject.
- If the path does not contain a database, make sure that it is fully accessible and either empty (containing no files or subfolders) or non-existent (the path will be created when it creates the database).
- The T.O.V.A. does not support network share databases or simultaneous access by multiple users at this time! Storing data on a server or network share will most likely result in lost data! You should store your data locally on the hard drive, and while multiple user logins on the same computer may use the T.O.V.A. , each must close the application before the next may open it.
Note: To move your database to a different computer, you can simply back up your database (section 21), copy the backup file to the new computer, and import it (section 22).
You can still always move your database as you previously could in the T.O.V.A. . This includes these main steps:
-
Exit the T.O.V.A. application.
- Discover the current location of your database.
- Move the folder to the new location
- Point the T.O.V.A. to the new location of the database.
If you’re not comfortable with these steps, contact T.O.V.A. technical support for assistance. We are happy to help.
34.4.1 Notes on choosing a database path
You can choose a different location to store your database (see section 25.4 above). Click ‘Change path’ to select a new database location, or you can type the path into the selected ‘Path’ field. There are a few things to remember when changing your database path:
-
If you are using a ‘Separate’ database (section 25.4), there will be a separate database for each user on the system. If moving to a different computer, each of these user’s databases (if any) may need to be moved.
- If your computer is shared by multiple users, make sure that all of the users can access the new path to the database.
- Do NOT move your database to a shared or network drive. The T.O.V.A. database must be stored locally–moving it elsewhere will likely result in data loss.
Note: If your computer is shared by multiple users, make sure the new path to the database has the correct file/folder permissions.
34.5 Database fails to open
There are a few different reasons why a database may fail to open:
WARNING! Storing data on a server or network share will most likely result in lost data! Many of the problems below can be caused by attempting to share a T.O.V.A. database over a network. This is NOT supported and will inevitably cause problems.
-
The T.O.V.A. database is locked by another user.
- While you may share a T.O.V.A. database between multiple users on a system, the T.O.V.A. application cannot be run by multiple users simultaneously. User 1 and User 2 may both run the T.O.V.A. application on the same PC, and they may either share a database or each have their own database (section 25.4), but User 1 must exit the T.O.V.A. application completely before User 2 may run it. The T.O.V.A. does not support simultaneous access by multiple users at this time.
- The database path is not valid.
- It may include characters that your operating system doesn’t allow for path names. The path may be to a drive that no longer exists or is unavailable.
- You may not have full access to the T.O.V.A. database.
- The T.O.V.A. database is a folder containing many other files and subfolders. Any user of the T.O.V.A. will need full access to all of those files and folders, even if they don’t intend to make changes. It may be that you have logged in as a different user than before, or that the permissions on the database files or folders have been changed. Examine the permissions on your T.O.V.A. database path, contact your IT department to correct the problem, or contact T.O.V.A. technical support for assistance (section 27).
- Your database fails to upgrade after updating to 8.2.
- This can be caused by minor database corruption—contact T.O.V.A. technical support for assistance (section 27).
- The T.O.V.A. database may have become corrupt.
- Because there are so many files and folders in the T.O.V.A. database, it is possible for problems to occur: a system might shut down unexpectedly or your system’s hard drive glitches or fails. The database automatically corrects many problems, but some issues that cannot be fixed automatically. Note: Serious database corruption can be caused if you locate your T.O.V.A. database on a network server or shared drive.
The T.O.V.A. has built-in automatic backups (section 25.5), though we recommend you also perform your own system backups to a secure location. If you have full access to the database path and the T.O.V.A. database still fails to open, please contact T.O.V.A. technical support (section 27). We can often help users recover some or all of their data.
34.5.1 Moving the database aside
If your T.O.V.A. database cannot be opened, the T.O.V.A. may offer to move the non-working database aside. If successful, the T.O.V.A. can then create a new, empty database where the former database was. That way, you can test new subjects, then contact The TOVA Company at a convenient time to recover your previous data, if possible. The original database that could not be opened will be preserved, renamed, in the same database folder.
34.6 Reassigning a session to a different subject
Note: It’s important that you make sure you’re administering the T.O.V.A. test for the correct subject, as children below the age of five-and-a-half do not take the same test as older subjects. If you administer the wrong test to your subject, the T.O.V.A. will not be able to properly interpret it.
Note: Do not try to reassign the test by editing the subject! If the test is assigned to Joe and it should have been assigned to Mary, editing the subject information will only leave you with two identical ‘Marys’.
You can reassign tests that have been administered or assigned to the wrong subject, but you should do so cautiously. Do the following:
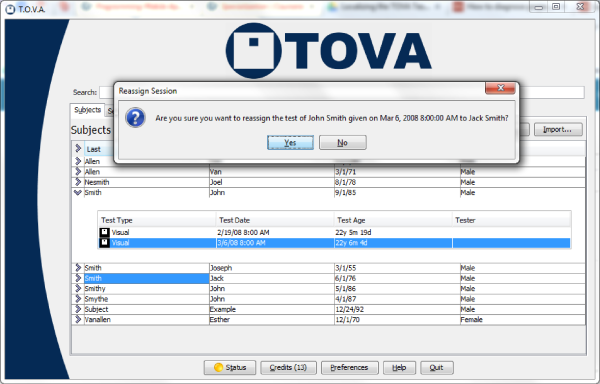
Click and drag the session
-
If you have too many subjects to see both subjects at the same time, enter search terms that include both subjects and as few others as possible. For instance, you could use sub:24 OR sub:17 to view only those two subject numbers. See section 35.2 for more search options.
- Click the ‘Subjects’ tab, if it’s not already selected.
- Click the ‘>’ symbol, in the left-most column, to expand the subject that contains the test to be moved.
- Click the test to move and, holding the left mouse button down, drag the test to the target subject. Release the mouse button.
- Click ‘Yes’ to confirm that you want to reassign the test.
34.7 Modifying Admin Preferences
There are certain T.O.V.A. preferences that require administrative privileges to access. If you are unable to access Admin preferences in the T.O.V.A. , you should run T.O.V.A. Admin Settings with administrative privileges.
Note: We do not recommend configuring the main T.O.V.A. application to always run with elevated permissions.
Note: Some preferences that can be modified in the T.O.V.A. application are not accessible in T.O.V.A. Admin settings.
Windows has a security feature called User Account Control. Even if you are an Admin user, you will usually run applications without Admin privileges. However, as long as you have access to an Administrator account, you can still modify T.O.V.A. Admin preferences.
The easiest way is from the T.O.V.A. ’s Preferences window, which got a new button in v8.2, ‘Change Admin settings’.
-
From the Preferences window, click ‘Change Admin settings’. The Preferences window will close.
- When prompted, agree to allow this program to make changes on your computer (Figure 114).
- T.O.V.A. Admin Settings will open, allowing you to modify the Admin settings. When you’ve finished, click ‘Save’.
You can also still use the separate T.O.V.A. Admin Settings application:
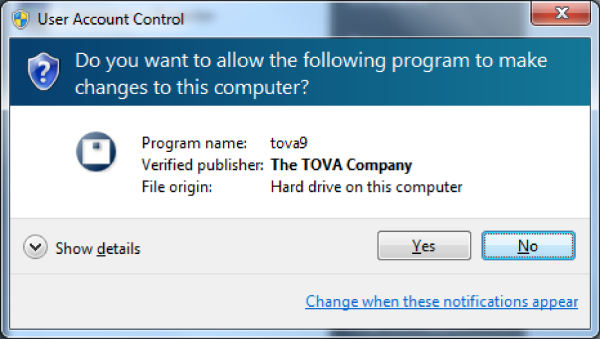
UAC message on Windows 7
-
Quit the T.O.V.A. application.
- Go to the ‘T.O.V.A. 9’ group in your Start menu.
- Click on ‘T.O.V.A. Admin Settings’.
- When prompted, agree to allow this program to make changes on your computer (Figure 114).
- T.O.V.A. Admin Settings will open, allowing you to modify the Admin settings. When you’ve finished, click ‘Save’ and run the T.O.V.A. normally.
Most users who have one account on their computer have that account configured as an Administrator already and can edit admin preferences. There is a script in the TOVA folder to give more limited users temporary access to admin preferences.
-
Quit the T.O.V.A. application.
- In the Finder, go to the TOVA folder in your Applications directory.
- Double-click on ‘TOVA Admin Settings.app’.
- A password dialog will appear. Enter your password or the username and password of an Administrator on the system.
- T.O.V.A. Admin Settings will run, allowing you to edit the admin preferences. See section 25 for more information.
- When you have finished editing preferences, click ‘Save’ to save your changes.
34.8 Disabling Sleep mode
When a computer is not being used for a while, some systems are configured to go into “Sleep mode", “Standby mode", “Hibernation", or some other power saving state. While this is good for conserving energy, it can be bad for External A/V testing. Because the T.O.V.A. test does not use the computer or mouse, some systems can fall asleep during a test, which will essentially ruin the results of the test.
To counter this, we’ve implemented a “mouse jiggle". While the T.O.V.A. test is being administered, the mouse cursor will move just slightly to the left and then the right. None of this is visible to the subject, because the T.O.V.A. USB device is sending a different video signal to the screen.
The mouse jiggle does not work on all PCs, however. To be on the safe side, we recommend that you disable Sleep Mode on any T.O.V.A. system where you intend to do External A/V testing. If that’s not possible, the computer should wait at least an hour.
Note: How to disable Sleep Mode on a given system can vary somewhat. If the instructions below don’t work for you, contact your system’s manufacturer.
34.8.1 Disabling Sleep mode on Windows 7
-
Click the Start button and type ‘Power’.
- From the list that appears, choose ‘Power options’.
- Select a new power plan if you want. For the selected plan, choose ‘Change plan settings’.
- Under ‘Put the computer to sleep:’, choose ‘Never’. You may have to disable this in multiple places (‘Plugged in’, ‘On battery’, etc.).
- Click ‘Save changes’.
34.8.2 Disabling Sleep mode on Windows 8/10
-
Bring up the Start page and type ‘Power’.
- Click ‘Settings’ and then choose ‘Power options’.
- Select a new power plan if you want. For the selected plan, choose ‘Change plan settings’.
- Under ‘Put the computer to sleep:’, choose ‘Never’. You may have to disable this in multiple places (‘Plugged in’, ‘On battery’, etc.).
- Click ‘Save changes’.